prisma 入門
事前準備
M1 Macにnodeとnpmをinstallする
こちらの記事にinstall手順がわかりやすくまとめられており、手順通りに行えば、問題なくinstall作業が完了できると思います。
installの際には、LTSの最新版である v16.14.2 を指定してinstallを行いました。
user@localhost ~ % nvm ls-remote
       v16.13.0   (LTS: Gallium)
       v16.13.1   (LTS: Gallium)
       v16.13.2   (LTS: Gallium)
       v16.14.0   (LTS: Gallium)
       v16.14.1   (LTS: Gallium)
->     v16.14.2   (Latest LTS: Gallium)
prisma Quickstart
公式ドキュメントのQuickstartを進めていき、prismaの基本事項をざっと確認します。
npm run dev を実行するとエラーが出るので、エラー文に従って、 prisma generate を実行します。
user@localhost ~ % npm run dev
Error: @prisma/client did not initialize yet. Please run "prisma generate" and try to import it again.
In case this error is unexpected for you, please report it in https://github.com/prisma/prisma/issues
at new PrismaClient (/Users/nagaitakuya/MyWorkspace/starter/node_modules/.prisma/client/index.js:3:11)
at Object.<anonymous> (/Users/nagaitakuya/MyWorkspace/starter/script.ts:3:16)
at Module._compile (node:internal/modules/cjs/loader:1103:14)
at Module.m._compile (/Users/nagaitakuya/MyWorkspace/starter/node_modules/ts-node/src/index.ts:1455:23)
at Module._extensions..js (node:internal/modules/cjs/loader:1157:10)
at Object.require.extensions.<computed> [as .ts] (/Users/nagaitakuya/MyWorkspace/starter/node_modules/ts-node/src/index.ts:1458:12)
at Module.load (node:internal/modules/cjs/loader:981:32)
at Function.Module._load (node:internal/modules/cjs/loader:822:12)
at Function.executeUserEntryPoint [as runMain] (node:internal/modules/run_main:77:12)
at phase4 (/Users/nagaitakuya/MyWorkspace/starter/node_modules/ts-node/src/bin.ts:567:12)
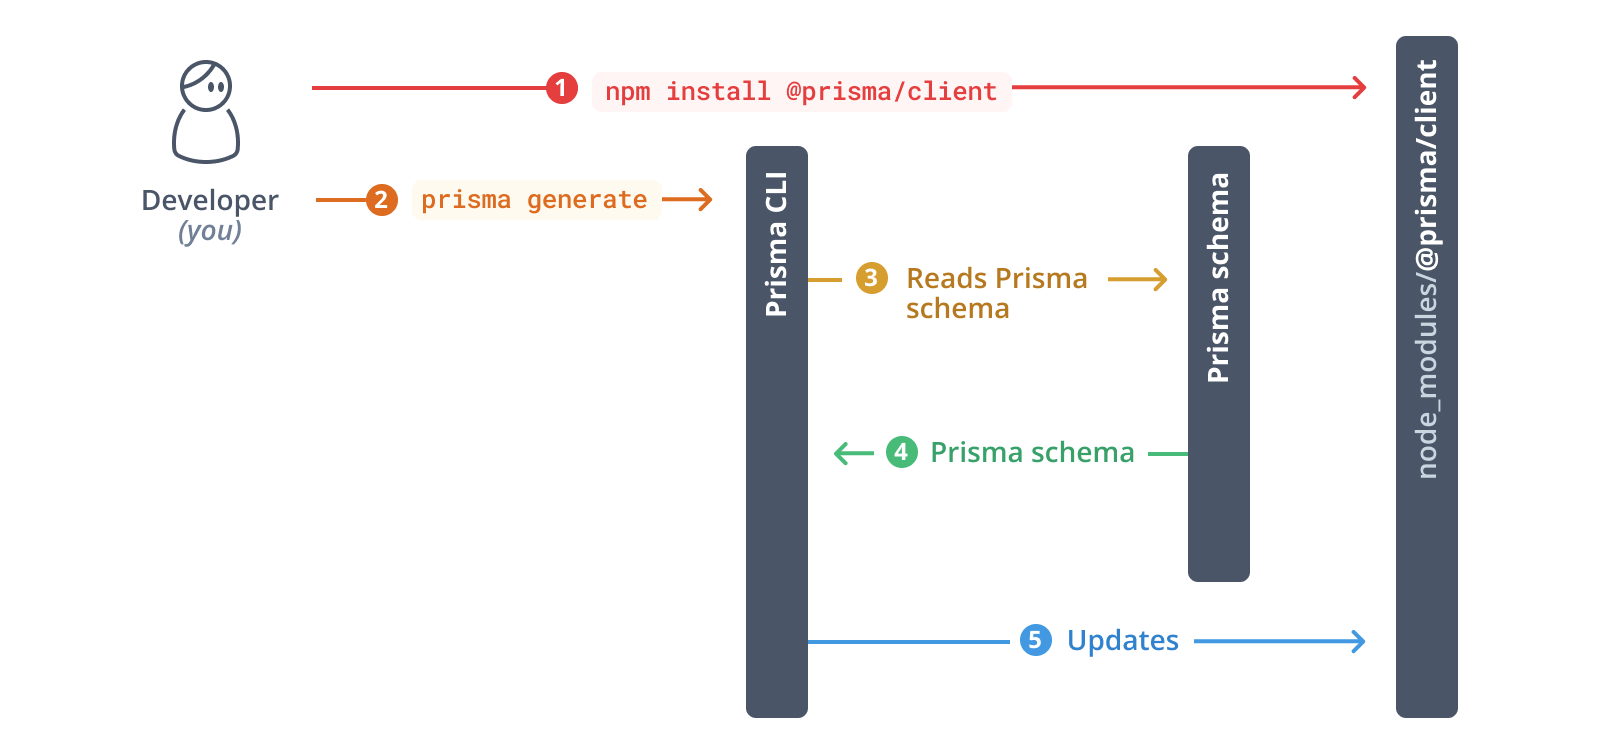
prisma generate
以下のコマンドを叩くことで、Prisma schemaを読み、Prisma Clientコードを自動で作成できるそうです。
npx prisma generate
npxとは(余談)
npx とはローカルでコマンドを実行する際に使用されるコマンドです。
node v5.2 以降では標準で内包されているみたいです。
npm でコマンドを実行する際に使用される npm run <コマンド名> を実行するためには、 packge.json にあらかじめ定義する必要があります。
  "scripts": {
    "dev": "ts-node ./script.ts",
    "prisma": "prisma generate"
  },
未定義の場合、コマンドを実行できません。
user@localhost starter % npm run prisma generate
npm ERR! Missing script: "prisma"
npm ERR!
npm ERR! To see a list of scripts, run:
npm ERR!   npm run

npm ERR! A complete log of this run can be found in:
npm ERR!     /Users/nagaitakuya/.npm/_logs/2022-04-09T03_19_27_775Z-debug-0.log
一方で、 npxを使用することで、packge.json にあらかじめ定義されていなくても、 npx prisma generate でコマンドを実行することができます。
npm run dev を再実行
ちなみに、 npm run dev は package.jsonにて次のようなコマンドが定義されています。
"ts-node ./script.ts"
再度、 npm run dev を実行すると、 レコードを取得することができました!!
[
  { id: 1, email: '[email protected]', name: 'Sarah', posts: [] },
    {
      id: 2,
      email: '[email protected]',
      name: 'Maria',
  posts: [
      {
        id: 1,
        title: 'Hello World',
        content: null,
        published: false,
        authorId: 2
      }
    ]
  }
]
MySQLとの接続を行う
- 新規プロジェクトでDBが用意されていない場合
- 既存プロジェクトでDBが既に用意されている場合
今回は、既存プロジェクトでDBが既に用意されていたので、上記のうち2つ目に絞って進めていきたいと思います。
まず初めに
prismaを使い始める際には以下のコマンドを実行して、 スキーマを定義するためのファイルを生成します。
npx prisma init
- ディレクトリ構成
.
├── node_modules
└── prisma
       └── shema.prisma
既存のDBからスキーマを持ってくる
以下のコマンドを実行すると、 既存のDBからテーブル定義などのスキーマを持ってきて、 schema.prisma に反映することができます。
npx prisma db pull
テーブル間でリレーションを定義する
1対多のリレーションを定義する場合、 以下の例で考えると、
Post model(1対多の1側)に
author User @relation(fields: [authorId], references: [id])
を定義し、
User model(1対多の多側)に
posts Post[]
を定義してやると、 Post テーブルと User テーブル間で1対多のリレーションを定義することができる。
model Post {
  id        Int      @id @default(autoincrement())
  title     String   @db.VarChar(255)
  createdAt DateTime @default(now()) @db.Timestamp(6)
  content   String?
  published Boolean  @default(false)
  author    User     @relation(fields: [authorId], references: [id])
  authorId  Int
}

model Profile {
  id     Int     @id @default(autoincrement())
  bio    String?
  user   User    @relation(fields: [userId], references: [id])
  userId Int     @unique
}

model User {
  id      Int      @id @default(autoincrement())
  email   String   @unique @db.VarChar(255)
  name    String?  @db.VarChar(255)
  posts   Post[]
  profile Profile?
}
クエリを発行する際に1対多のリレーションをもつテーブル間でjoinする方法については後ほど記述します。
DBのテーブル名 & カラム名にmodel & フィールドをマッピングする
modelに関しては @@map("table_name") model内のフィールドに関しては、 @map("colomn_name") でDB側のテーブル名及び、カラム名にマッピングを行うことができるそうです。
model MyUser {
  userId    Int     @id @default(autoincrement()) @map("user_id")
  firstName String? @map("first_name")
  lastName  String  @unique @map("last_name")

  @@map("my_user")
}
prisma clientに反映する
新規でschema.prisma を作成した際、及び schema.prisma を編集した際には、以下のコマンドを実行して、 prisma client への反映を行う必要があります。
npx prisma generate
schema.prisma に定義されたスキーマがprisma clientに反映されるフローの詳細については公式チュートリアルにて図解がされています。
テーブルのjoinを行った上でレコードを取得する
include を使用してやることでテーブルのjoinを行うためのクエリを発行した上で、レコードの取得が行えるようになります。
  const allUsers = await prisma.user.findMany({
    include: {
      posts: true,
      profile: true,
    },
  })
joinを行ったテーブルの中で特定のカラムだけ取得したい場合
const users = await prisma.user.findMany({
  select: {
    name: true,
    posts: {
      select: {
        title: true,
      },
    },
  },
})
select 文を発行する際の reference
Author And Source
この問題について(prisma 入門), 我々は、より多くの情報をここで見つけました https://zenn.dev/takuyanagai0213/articles/4cd72bc30c594d著者帰属:元の著者の情報は、元のURLに含まれています。著作権は原作者に属する。
Collection and Share based on the CC protocol