flutterを始めたのでとりあえず bottomNavigationBarつけてみる
ゴール
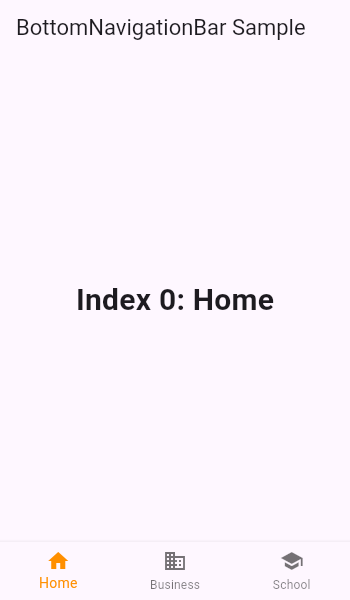
flutterを使ってアプリ開発を始めるぞ!ということで自分の勉強のメモとして今回はアプリでよくみる
画面下部のナビゲーション bottomNavigationBar をつけてみようと思います。

動作環境
- OS: macOS Catalina(10.15.4)
- Xcode: Version 11.1
- Android Studio: Version 4.0
flutterの環境構築が済んでないよという方は以下記事を参考にしてください。
Install - Flutter
MacでFlutterの開発環境を構築する手順
インストール | Flutter Doc JP
ボトムナビゲーション作成
まずは画面遷移の前に画面の状態を変えてみましょう
以下公式からの完成したコードです
// Flutter code sample for BottomNavigationBar
// This example shows a [BottomNavigationBar] as it is used within a [Scaffold]
// widget. The [BottomNavigationBar] has three [BottomNavigationBarItem]
// widgets and the [currentIndex] is set to index 0. The selected item is
// amber. The `_onItemTapped` function changes the selected item's index
// and displays a corresponding message in the center of the [Scaffold].
//
// 
import 'package:flutter/material.dart';
void main() => runApp(MyApp());
/// This Widget is the main application widget.
class MyApp extends StatelessWidget {
static const String _title = 'Flutter Code Sample';
@override
Widget build(BuildContext context) {
return MaterialApp(
title: _title,
home: MyStatefulWidget(),
);
}
}
class MyStatefulWidget extends StatefulWidget {
MyStatefulWidget({Key key}) : super(key: key);
@override
_MyStatefulWidgetState createState() => _MyStatefulWidgetState();
}
class _MyStatefulWidgetState extends State<MyStatefulWidget> {
int _selectedIndex = 0;
static const TextStyle optionStyle =
TextStyle(fontSize: 30, fontWeight: FontWeight.bold);
static const List<Widget> _widgetOptions = <Widget>[
Text(
'Index 0: Home',
style: optionStyle,
),
Text(
'Index 1: Business',
style: optionStyle,
),
Text(
'Index 2: School',
style: optionStyle,
),
];
void _onItemTapped(int index) {
setState(() {
_selectedIndex = index;
});
}
  @override
  Widget build(BuildContext context) {
    return Scaffold(
      appBar: AppBar(
        title: const Text('BottomNavigationBar Sample'),
      ),
      body: Center(
        child: _widgetOptions.elementAt(_selectedIndex),
      ),
      bottomNavigationBar: BottomNavigationBar(
        items: const <BottomNavigationBarItem>[
          BottomNavigationBarItem(
            icon: Icon(Icons.home),
            title: Text('Home'),
          ),
          BottomNavigationBarItem(
            icon: Icon(Icons.business),
            title: Text('Business'),
          ),
          BottomNavigationBarItem(
            icon: Icon(Icons.school),
            title: Text('School'),
          ),
        ],
        currentIndex: _selectedIndex,
        selectedItemColor: Colors.amber[800],
        onTap: _onItemTapped,
      ),
    );
  }
}
部分的に見る
@override
Widget build(BuildContext context) {
return Scaffold(
appBar: AppBar(
title: const Text('BottomNavigationBar Sample'),
),
body: Center(
child: _widgetOptions.elementAt(_selectedIndex),
),
bottomNavigationBar: BottomNavigationBar(
items: const <BottomNavigationBarItem>[
BottomNavigationBarItem(
icon: Icon(Icons.home),
title: Text('Home'),
),
BottomNavigationBarItem(
icon: Icon(Icons.business),
title: Text('Business'),
),
BottomNavigationBarItem(
 icon: Icon(Icons.school),
 title: Text('School'),
),
],
currentIndex: _selectedIndex,
selectedItemColor: Colors.amber[800],
onTap: _onItemTapped,
),
);
}
BottomNavigationBarItem
BottomNavigationBarItem(
icon: Icon(Icons.school),
title: Text('School'),
),
icon はナビゲーションのアイコン、titleはアイコンの下のタイトルになります。
iconは以下のページから探して変えることができます。
currentIndex , selectedItemColor, onTap
currentIndex: _selectedIndex,
selectedItemColor: Colors.amber[800],
onTap: _onItemTapped,
onTapはナビゲーションのボタンを押すと_onItemTapped が動きます
  void _onItemTapped(int index) {
    setState(() {
      _selectedIndex = index;
    });
  }
_onItemTapped で押したボタンが何番目か indexを渡してあげて
setStateのなかで _selectedIndex にセットします。
すると currentIndexに反映されてナビゲーションの現在位置が変わります。
currentIndex: _selectedIndex,

↓

_selectedIndex が変わることにより bodyの中身も切り替えます。
body: Center(
        child: _widgetOptions.elementAt(_selectedIndex),
      ),
_widgetOptions には以下の内容が設定されているためナビゲーションを押した時にそれぞれに応じた内容が出されます。
static const List<Widget> _widgetOptions = <Widget>[
    Text(
      'Index 0: Home',
      style: optionStyle,
    ),
    Text(
      'Index 1: Business',
      style: optionStyle,
    ),
    Text(
      'Index 2: School',
      style: optionStyle,
    ),
  ];
selectedItemColor
ナビゲーションが選択されたときの色を指定します
色は以下のURLから探すことができます。
https://api.flutter.dev/flutter/material/Colors-class.html#constants)
selectedItemColor: Colors.amber[800],
軽く触ってみて感じたこと
flutterに関して、いいなと思った点は
- 一つのコードでiOS,Androidアプリを作成できる
- ホットリロードがある
- 公式のドキュメントに関してもサンプルコードがついている&読みやすい
- Material Design系のUIですぐにUIを作成できる
- コード量少ないというのはあるけれども、Dart初心者の僕もコードが読みやすく感じた
まだ少しだけしか触ってない状態でこんなにもいいなと思える部分が出てきたのでワクワクしてきました。
今後も何個かパーツを作っていき最終的には一個のアプリにしていこうと思います。
flutter自体の記事も調べるとたくさん情報出てくるので困らないのもいいですね。
公式のチュートリアルもあるのでもっと勉強していこうと思います。
Author And Source
この問題について(flutterを始めたのでとりあえず bottomNavigationBarつけてみる), 我々は、より多くの情報をここで見つけました https://qiita.com/takaHAL/items/e572dd5d4cb49d2e7675著者帰属:元の著者の情報は、元のURLに含まれています。著作権は原作者に属する。
Content is automatically searched and collected through network algorithms . If there is a violation . Please contact us . We will adjust (correct author information ,or delete content ) as soon as possible .